Showing posts with label projects. Show all posts

Monday, February 4, 2013

{Before & After} A Functional Landing

Last week concluded a home project which has been in the works for quite some time. Not only was it a necessary fix due to our ever-growing family and therefore, changing needs, but it was somewhat of a safety concern for us with a little one running around.

One of the most appealing qualities of our home is its open and spacious feel, which really lends to extra spaces that can be transformed as our needs for our home change.  In this particular case, what we needed was more storage space for things like my craft/sewing supplies due to my husband now needing a dedicated home office and a little more space for Claire's toys.

Our upstairs landing previously looked like this:
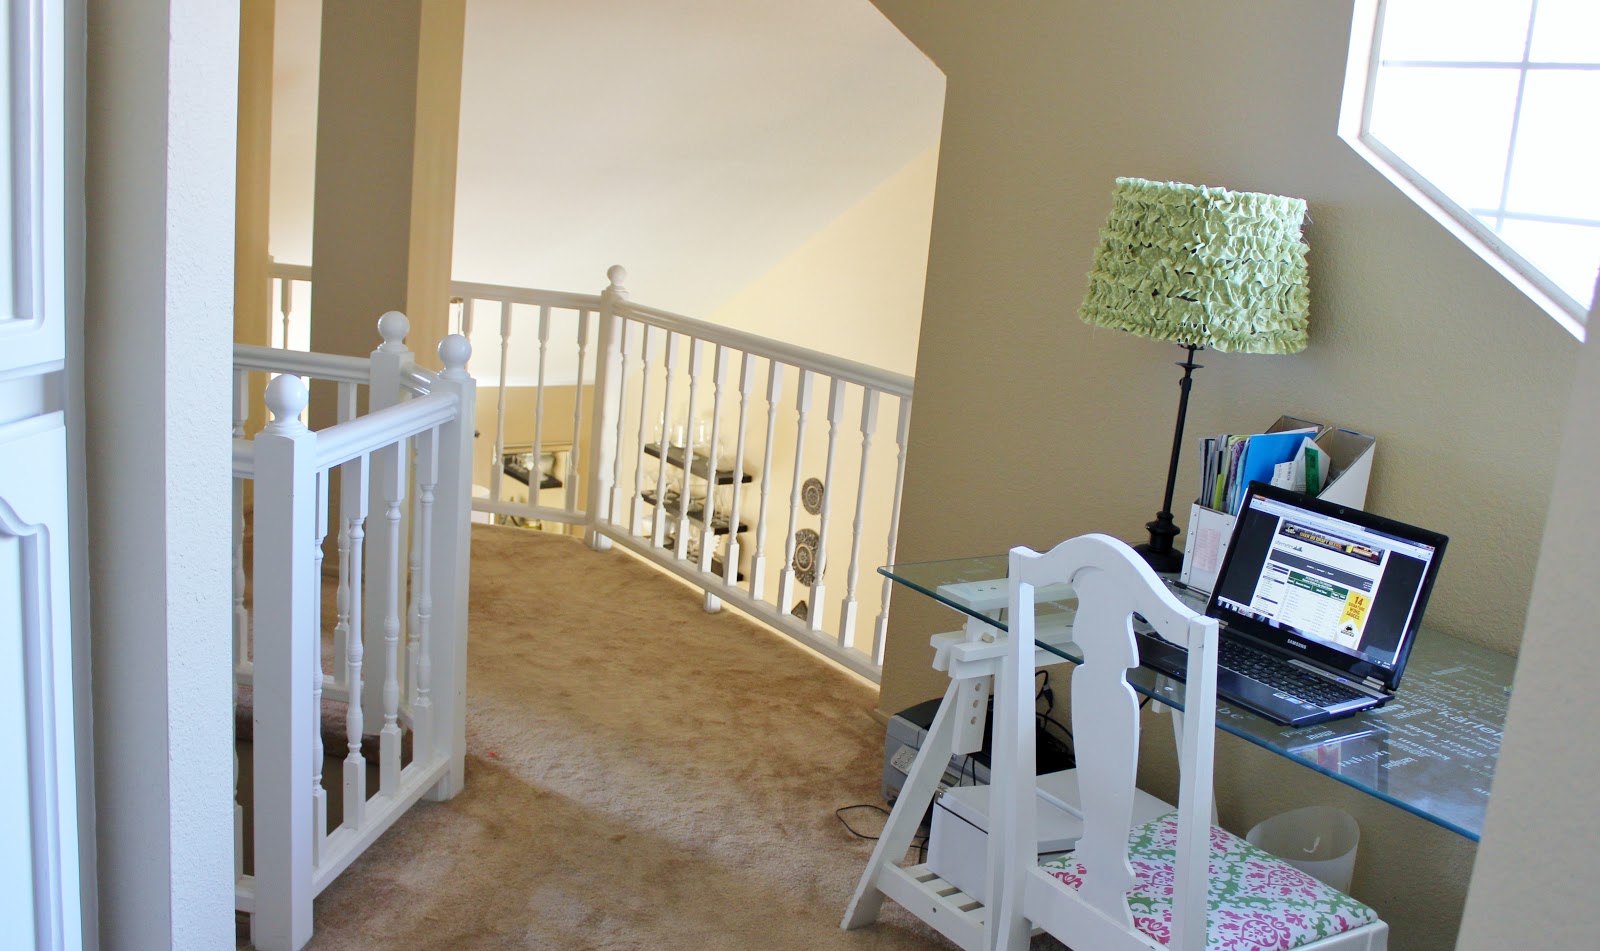
From the upstairs


And from downstairs:

We didn't all-together hate how it looked (with the exception of that awful rolled carpet above!), but it certainly lent itself to a lack of privacy due to the high windows in our family room that come up to the second story. But it also made it near impossible to hide anything (aka:the vacuum you see in the picture above). As for safety, the slats were much too wide for curious little ones.

So we talked through what we could do with Chris' Dad, as he is the family guru for projects such as this. As a Christmas present, he offered his labor and the materials to build what we wanted! Sweet!! For the past two weeks he has been here transforming the above into this!:


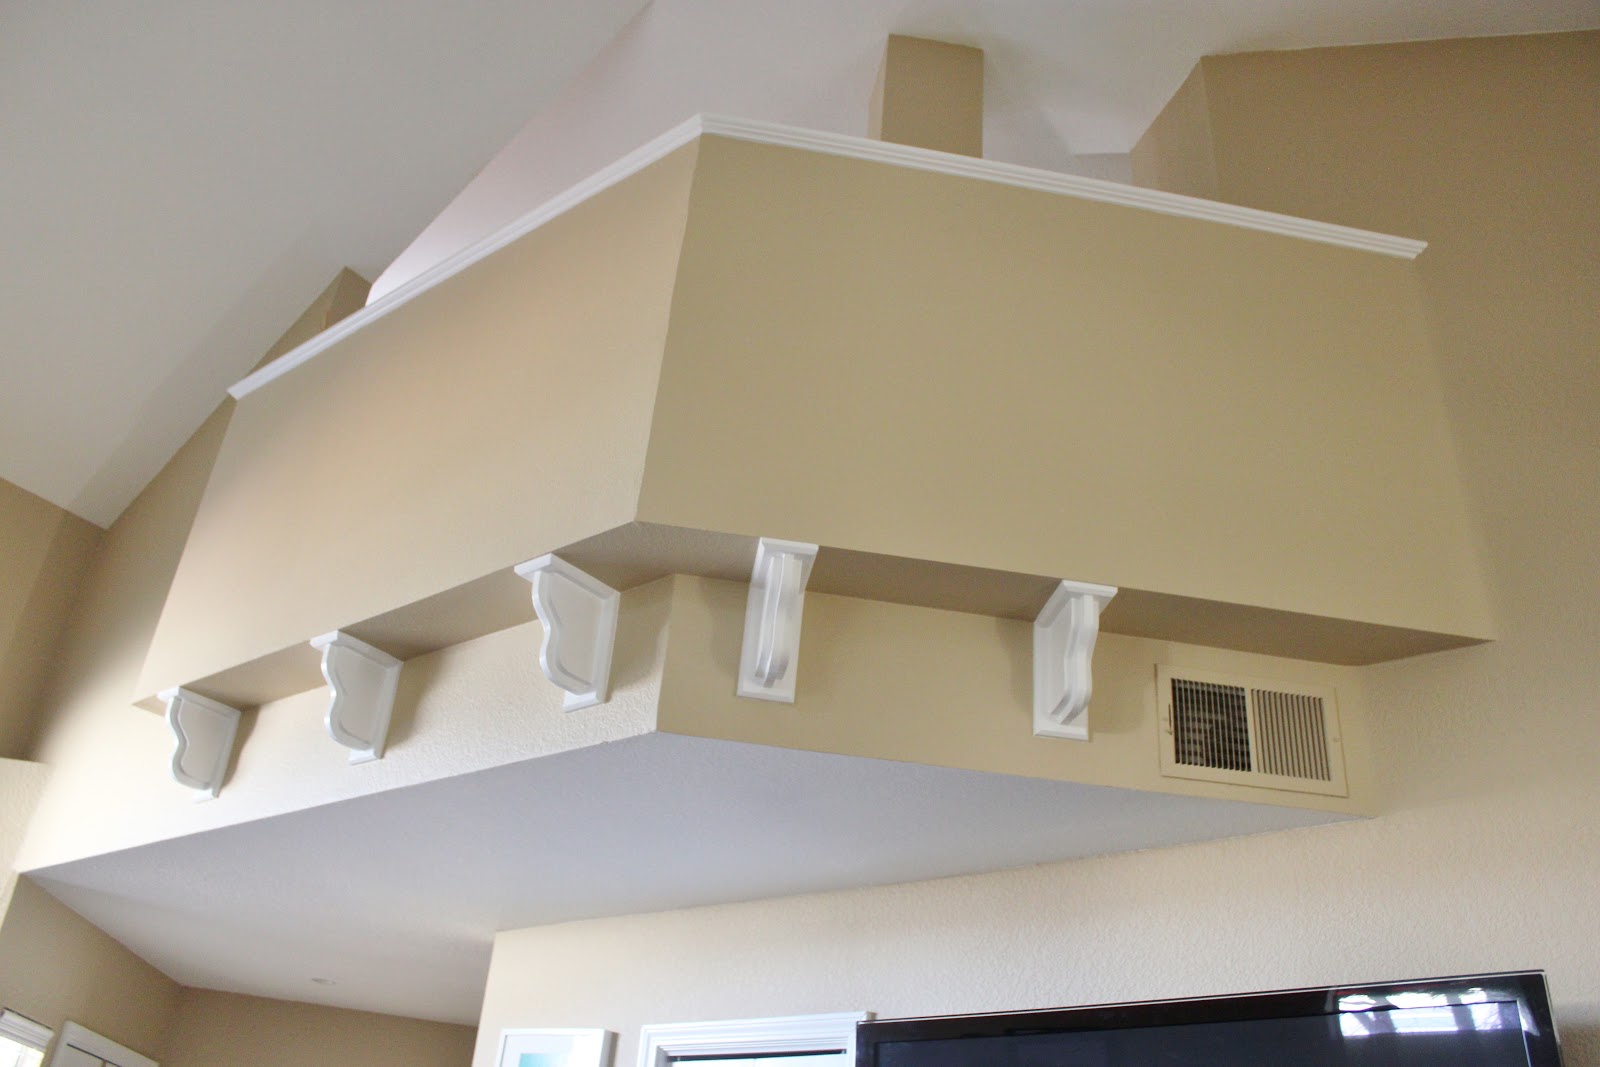
We are completely and totally in love with the transformation! And while it certainly added the desired function of more storage, we love how open, yet intimate it made the space feel! We now have the privacy we wanted, a ton of storage space and a bonus, an added space for Claire to play! I didn't capture it very well here, but the far left set of shelves that house my sewing and craft supplies are actually the longest of the three, giving me plenty of needed space:


We moved my desk back into the office and made space for another play area. I especially love this because we now have a designated space for the play kitchen we plan on building for Claire later this year :) And in the future, when our kids are school-aged, we would love to add a built-in desk in the corner.

My father-in-law does superior work (much like my awesome husband!) and really gave us a beautiful gift!

Tuesday, August 21, 2012

{The Nursery: Closet Makeover}

One of my favorite aspects of Claire's nursery is the massive closet. I mean, how many 9-month old's do you know with their very own walk-in? Not only does it easily accommodate her generous wardrobe, but since we first transformed the room, I've pictured her own little space in there. I've had all sorts of ideas, from a reading nook, to a play area, to a place to play dress-up! I also envision her making forts in there with her siblings one day :) The possibilities are endless and I really wanted to maximize the space.

A few weeks ago as I was packing away the clothes she's outgrown, I decided it was time to make the upgrade. Ultimately, we decided that our biggest need right now was a place to put Claire's toys and a cozy nook to read with her. So we popped on over to Ikea and grabbed a few bins for her smaller toys, a small carpet square for texture and a pop of color, a reading chair (for when she gets older) and of course, these toys I talked about!

And then there was the matter of book shelves I wanted to build to easily store most of her book collection. I found a quick and easy tutorial and my hubby went out and purchased the materials. But then something happened...we made another quick trip to Ikea last weekend and discovered they had basically the exact same ledge-like shelves he was going to make. For only $10 each! (check them out!) Now friends, we are diy-ers all the way, but when you can find, for all functioning purposes, the same thing pre-made for cheaper than you can build it, sometimes it's just worth it! And since we knew our time was limited, we decided that Ikea's shelves were the route to go.

I feel like the shelves really made the most of our space and provided much-needed storage without taking up precious floor space. And the best part, the whole transformation was pretty inexpensive and will easily accommodate any updates as she gets bigger!


Come and take a peek inside Claire's new reading nook/playroom!


Her toys now have a home that isn't the living room or hallway- Yay!!

I've been storing these pillows for a while, knowing they would come in handy at some point! In the future I may sew some new pillow covers, but for now they are perfect for snuggling up and reading to my girl!

I was a little concerned about the height of the bottom shelf as Claire will pull herself up on anything within reach. So hubby made sure to install the extra heavy duty anchors so they wouldn't come out if she used them for standing support (which she already has!).


I love how easily accessible and visible her books are now!


This is where we spend a lot of our indoor playtime these days!

She seems to love her new space :)

Wouldn't you want to play and read here?!
 

Wednesday, June 20, 2012

{Island Fever...}

Unfortunately, this is not a post telling you that we're flitting off last minute to a tropical paradise. But the next best thing, we made a little house update that's been on our list for a few months. Introducing, our newest addition to the breakfast nook!

But first, what it looked like before:

And now!:


Chris and I were very fond of and quite proud of our black pedestal kitchen table. It was a true labor of love from my husband to me two years ago when he sanded it down from many layers of paint to give me my dream table. I thought we would have that table forever. But after living in our home for about a year, we noticed that it is actually our dining room that gets the most use.

Sometime last Fall, Chris brought up the possibility of putting an island in the breakfast nook instead, something that, ironically, I had been thinking, too! Right away we found the Stenstorp kitchen island from Ikea. We fell immediately in love. We were first drawn to its sturdy, solid construction and additionally, the two stainless shelves that would tie in our stainless appliances, serve as extra storage and add a bit of the modern touch that my husband loves so much. We also appreciated that it provides some seating on the back side if we still want to have coffee or breakfast in that sunny little nook. What's not to love?

Like many ideas/projects at the moment, this one got put on our 'something to save for' list. And then last week I had a wild hair to have an impromptu garage sale in an attempt to purge some closets and maybe earn a little extra cash for those little projects we've been itching to finish.  At the prompting of my genius husband we brought out our kitchen table hoping maybe it would sell and the money could go toward our island. Within the first hour it was gone - score! 

And then as luck would have it, I decided to do a little browing on craigslist Monday morning and there it was, our island, in mint condition selling for $100 less then the original price! You should know that Chris has a search set up for this very piece on the craigslist app on his phone and we've never seen it listed, but this particular seller had spelled it incorrectly so it never showed up on his search. So basically, me finding it was pure luck! I wasted no time calling the seller and picking it up. I am certain I looked like a five-year old on Christmas morning:)

And now, this is what I get to look at every day while I'm in the kitchen! I am so happy with how clean and crisp it looks, especially next to our white cabinets!


Ahh...I LOVE it and seriously can't help smiling every time I see it!


Friday, April 20, 2012

Backyard Chronicles {Part 1}

This post has been a long time coming! And the truth is, because this project will be quite a lengthy one, I didn't want to share any before shots of our backyard until we were ready to begin the transformation. And friends, the time has finally come and we're ready to get this show on the road!

Living in the area we do, outdoor living is essential. When we bought our home, having a good sized yard was high on our list of priorities. Even one that needed some TLC (as our definitely does!), because if nothing else, we are able see past things in their current state to what we want them to be. We have so many ideas and inspiration for this space!

What I am about to show you is our backyard today from two vantage points. We have done nothing besides normal maintenance since moving here. As you will see, it's got a ton of potential but our goal is to transform that potential into a beautiful outdoor oasis!


It's a little rough, super plain and in need of some serious landscaping, but we have some awesome ideas! Some will take more time than others, so our expectations are that it will evolve somewhat slowly and probably not be totally complete for a few years. But with that said, we hope to start enjoying our yard soon as we start to make some big improvements!  

Here is our long-term project list:

  • get rid of the spa
  • pressure wash the patio to remove the yellow paint
  • purchase a large table (hopefully to accommodate 8)
  • build an overhang to cover the patio area
  • remove most of the rocks around the pool area and fully landscape that area
  • plant some greenery that will grow up the retaining wall (possibly jasmine)
  • plant something that will create some privacy along the back fence
  • landscape large (left) side yard
  • build a shed on the small (right) side yard to store pool and lawn equipment
  • build a structure around both the AC unit and the pool equipment
  • replace the entire fence
  • re-surface the pool
  • level and cement a partial area of the large side yard
As you can see it's a hefty list, but one we're very excited about starting to check off!!  Stick around because I will be updating our progress all summer long!

Thursday, February 2, 2012

Entryway {Re-Done}

For several months now I've been plagued with the dilemma of how to control the pile of shoes at our front door. Since our entryway isn't very big, I didn't want anything that would be too obtrusive and possibly be a tripping hazard, but I knew I wanted it to look like a designated entryway.

After finding what I believe to be the perfect solution, I am entirely convinced that this piece was made for our space! We went with this shoe organizer from Ikea's Hemnes collection. Once Chris finished putting it together we both stepped back and fell completely in love. It couldn't be a more perfect fit! I've got to hand it to Ikea, they sure do have a knack for making the most of small spaces!


It fits up to 8 pairs of shoes (and more if they're flip flops or flats!). Amazing for such a slim design!


I'm so excited to have another thing crossed off of our list! Next up: the laundry room!

Monday, January 30, 2012

Master Bedroom: Closet Progress & A Tour

So much for accountability, huh? Remember when I said we were going to finish our closet in September? Yeah, that didn't happen. We started strong and then the hassle of deciding to build a closet organizer or purchase one got the better of us and we moved on, putting the disaster we call our closet on the back burner-again!

Luckily, with some nudging from my friend who was curious if we had ever finished, we started back up and I am happy to say it is almost complete! I know, I know, it's about time!

Here's where we are today:

  • Our clothes have been purged and a large trip to Goodwill was made.
  • We took down the wooden rod that was admittedly bowing from the weight of my clothes and two metal rods were added to accommodate both mine and Chris' clothes. Not only does that make them more sturdy, but it's a far more efficient use of the space!
  • And finally, after pricing out materials, we decided it was actually cheaper to purchase the 5x5 Expedit shelving unit from Ikea (which we scored for $179 with the Ikea family discount this month!). It fits like a glove, making the most of our closet space.
We are so happy with the progress so far! Now I just need to find the perfect fabric to cover both closets and this project will be closed-thank heavens!

Click here for a glimpse at the before.


And while we're on the Master Bedroom, I thought I would give you a little tour of its current state (something I realized I have never done!).

On our list to complete the bedroom:

  • Replace ceiling fan
  • Purchase and possibly refinish nightstands
  • Upgrade to a Cal King bed
  • Get a full size mirror (like this one)
  • Eventually put up crown molding
  • And I'm still playing with the idea of building a headboard


I'll keep you updated! Happy Monday!!

Monday, January 9, 2012

{DIY} Headband Storage

Over these past eight weeks, Claire's collection of headbands has multiplied by leaps and bounds! It didn't take long for the basket I was storing them in to completely overflow. And when I could no longer see most of them, I decided it was time for some additional headband storage. Enter my little afternoon project.

I'm quite proud that the inspiration for this little solution was all my own, no Pinterest necessary! All it took was a piece of twine (which I already had), two drawer pulls ($1 at Michaels) and two packages of hot pink, glittered mini-clothes pins ($2.99 for 10 at Michaels). Granted, I could have saved a few bucks and glittered some clothes pins I already had, but I saved myself the time and the glitter mess (since, as we all know, glitter is the herpes of craft supplies!) which was totally worth the extra money!

All in all, I am really happy with the turnout! Three cheers for simple, inexpensive (and not to mention, cute) organization!


Tuesday, July 26, 2011

For Modesty's Sake

I am a full-fledged believer in breastfeeding. So much in fact, my freshman year of college I did a persuasive speech on why breastfeeding is so beneficial for my Communications final...And because of this fact, I have absolutely no problem with a woman nursing in public.

However, I totally understand and respect that breastfeeding is not for everyone and that it's a very personal choice. So, with respect to those who do not wish to see me nursing my baby, and for modesty's sake, I whipped up a few fantastically cute nursing covers (like these and these)!

I've seen them in several stores and drooled over a few lovely patterns, but once again my frugal side kicks in and I can't help but pull a, " I could totally make that!" when I see the $40-$50 price tag. Naturally, making them myself was my chosen alternative. And get this, I made both for only $18!!


After browsing a few patterns, I settled on this tutorial I found over at made by mama monster for her detailed and simple instructions and the fact that she included the wired top so I can see baby while she's nursing. I just love how they turned out! A full report on their usefulness after baby arrives:)

Thursday, July 21, 2011

Sew Thrifty

Baby spit up? We've got that covered! We are officially stocked up on burp cloths, thanks to this little Tuesday night project. And the best part-they were super affordable to make! Thanks to plenty of leftover fabric I had from other recent projects, the only thing I needed was a 12-pack of Gerber cloth diapers (the old school kind), which I ended up finding at Walmart for $12. That brings each burp cloth to $1 a pop!

Everything I read about homemade burp cloths said cloth diapers were the most absorbent since they're made for baby's bottom. I love them to pieces, and hey, these might even make wiping up baby girl's mess a little more pleasant...maybe...


Tuesday, July 19, 2011

One Frame, Two Ways

This little project started with an all too familiar trip to Goodwill a few months back. I was browsing the housewares when I spotted two hideous brass frames filled with two even more hideous prints. They were deplorable to say the least, but since the frames themselves were quite unique, I was sure they could be salvaged for something a little less, well, hideous! Especially since they were marked down 50% . 

Sadly, within a few weeks of purchasing them we bought our house and into the spare closet they went, completely forgotten about. Until a few weeks ago that is, when all things buried in the depths of the closet were discovered. It was then I knew exactly how I wanted to re-purpose them. I must thank my mom for convincing me not to put them back when I started second guessing my purchase!

So without further ado, I give you, my new earring holder and Baby Girl's hair pretty holder! I am beside myself giddy that one simple purchase was able to fulfill two crafts I've been dying to make!

{Of course, until Baby Girl gets her own hair pretties, mine will be proudly displayed}


And this couldn't have been simpler to put together! All you need to do this yourself is:

1 frame, any shape and size
1 can spray paint
Depending on the size frame, about 1-2 yards of pretty ribbon/lace
Hot glue gun

After gently popping out the glass and picture, I (actually, Chris) gave each frame a few even coats of white spray paint and waited 24 hours for them to dry. After picking out just the right ribbon and lace, I simply hot glued strips to the back of the frame, making sure each strip was pulled taut so there was no sag. After a few minutes, you're ready to load em' up!


Don't you love discovering treasure in your own mess?!

Wednesday, July 13, 2011

Nesting and Boppy Covers

Call it nesting to the tenth degree, but I spent last weekend purging, organizing and completely cleaning out our guest/craft room! All for the sake of having a clean room to complete the bazillion sewing projects I currently have on my list of things to make. With the insane amount of energy I've encountered lately, I figure I'll take advantage while it's here!

My first project was sewing my own Boppy cover. Since all the covers I was finding seemed crazy overpriced ($40-50 each!), I decided that making them myself was the route I wanted to take. Plus, I could customize with a fabric I loved!

With a little advice from my friend Taryn, who also went the DIY route, I was off to Joann's! And in a few short hours, I ended up with this:


Ahh, I LOVE this pretty combo of celery, blush and coral! It's so girly and chic!

 So glad I decided to make my own because not only was this a really simple project, but I saved a lot of money since I was armed with a few 40% off coupons for Joann's, which I constantly get in the mail!

p.s. - wouldn't these make a wonderful baby shower gift?!

For anyone interested in making your own Boppy cover, I used the Simplicity pattern 4225.

Here's the breakdown of what this little project cost me:

Nurture Nest Pillow insert: $17
3 yards of fabric: $18 (enough for 2 covers)
Piping: $5
3' velcro strip $.50
Total cost: $40.50

Next on my list: a nursing cover and burp cloths!
Related Posts Plugin for WordPress, Blogger...